Machine Embroidery Thread Organization with Dixie Cups

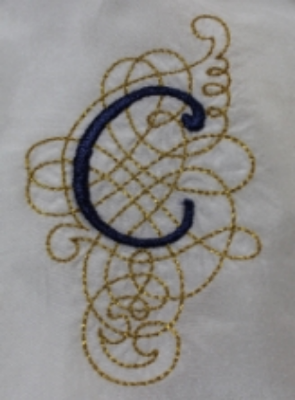
Machine embroidery is so much fun and part of the fun is playing with all those threads. Recently, I made my college daughter a Mexican flower peasant blouse that had 53,877 stitches using thirteen different bright and neon colors. I had so much fun organizing all those threads.

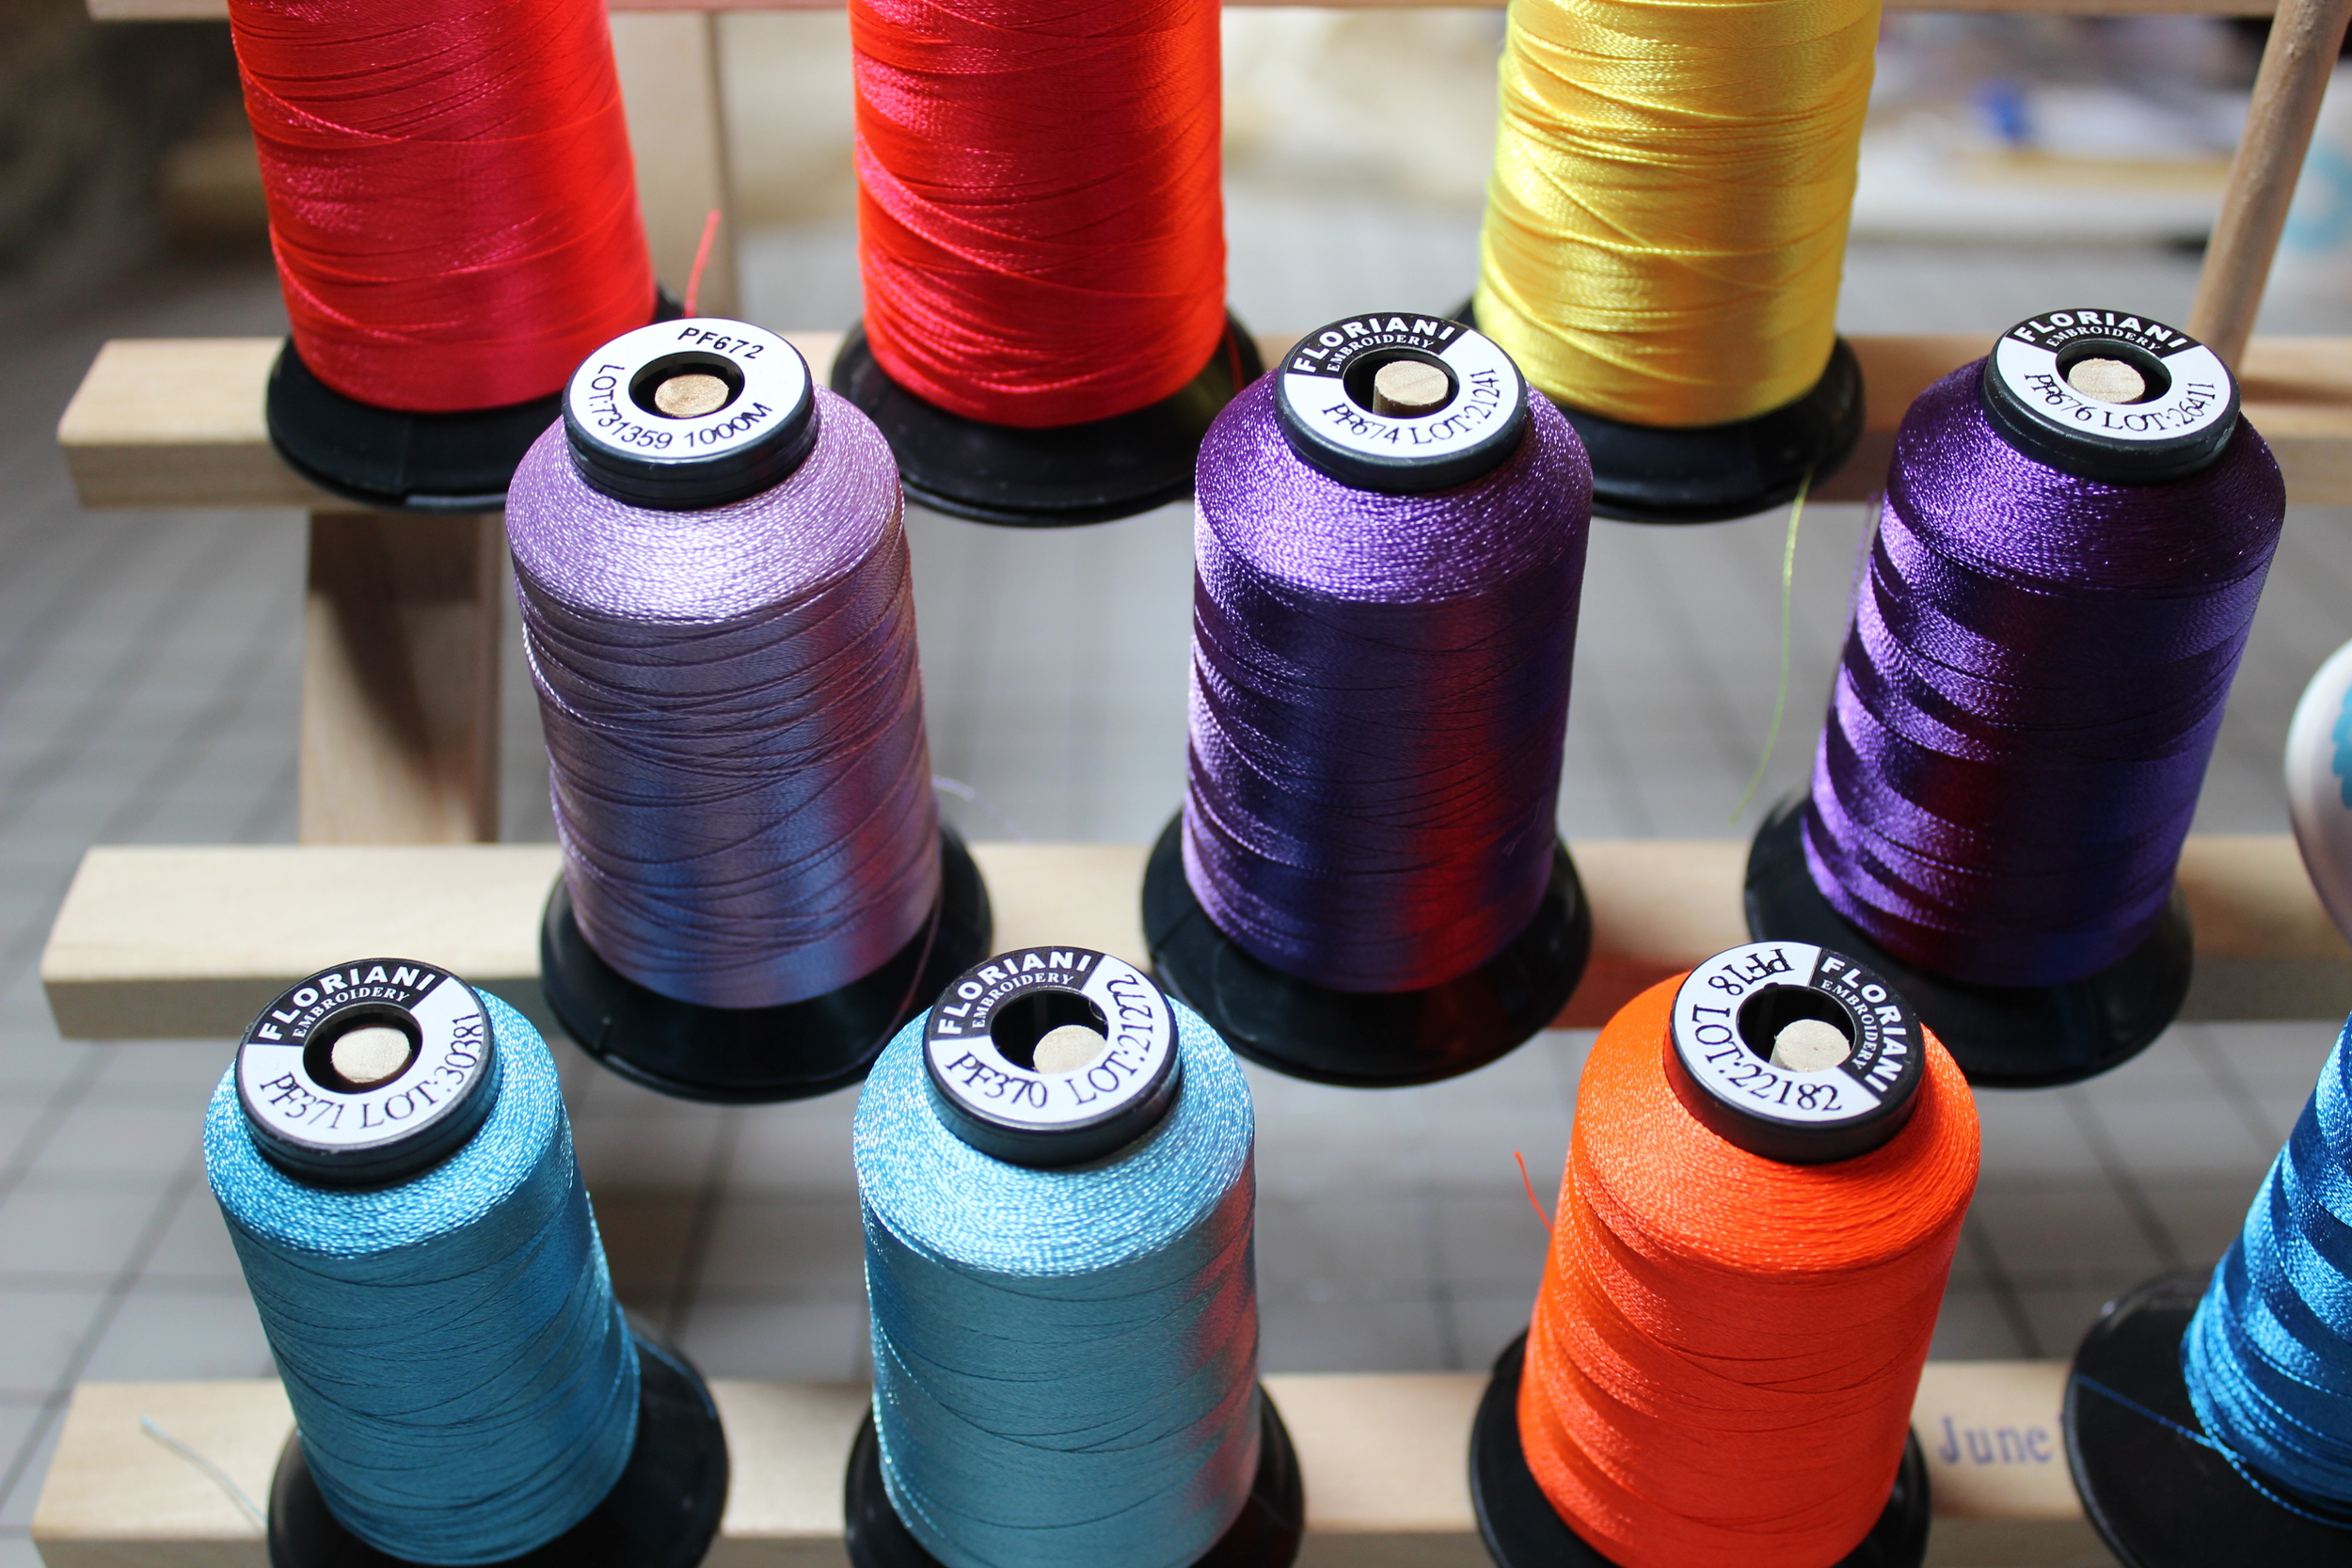
Many machine embroiders use these wooden or plastic spindle type racks to display their vast assortment of threads, aka, their stash. I also use this method and have several to keep them all sorted by color, but I also have one wooden "June Tailor" rack that is collapsible.  I can conveniently fold it away when I am not using it. 

It holds thirty-four different spools, allowing me to sort that many thread jumps. Personally, I have never had a design loaded into the machine that was more than that, as I have always had to re-hoop to get that much onto my surface.

Most embroidery machines today have the capability to show the sequence order of the thread jumps.  This is such a wonderful feature and allows you to keep everything organized by referring to the sequence number on the machine compared with that on the design sheet and then keeping the threads in the same order on the rack. Checking and rechecking all three constantly makes for a perfect stitch-out.

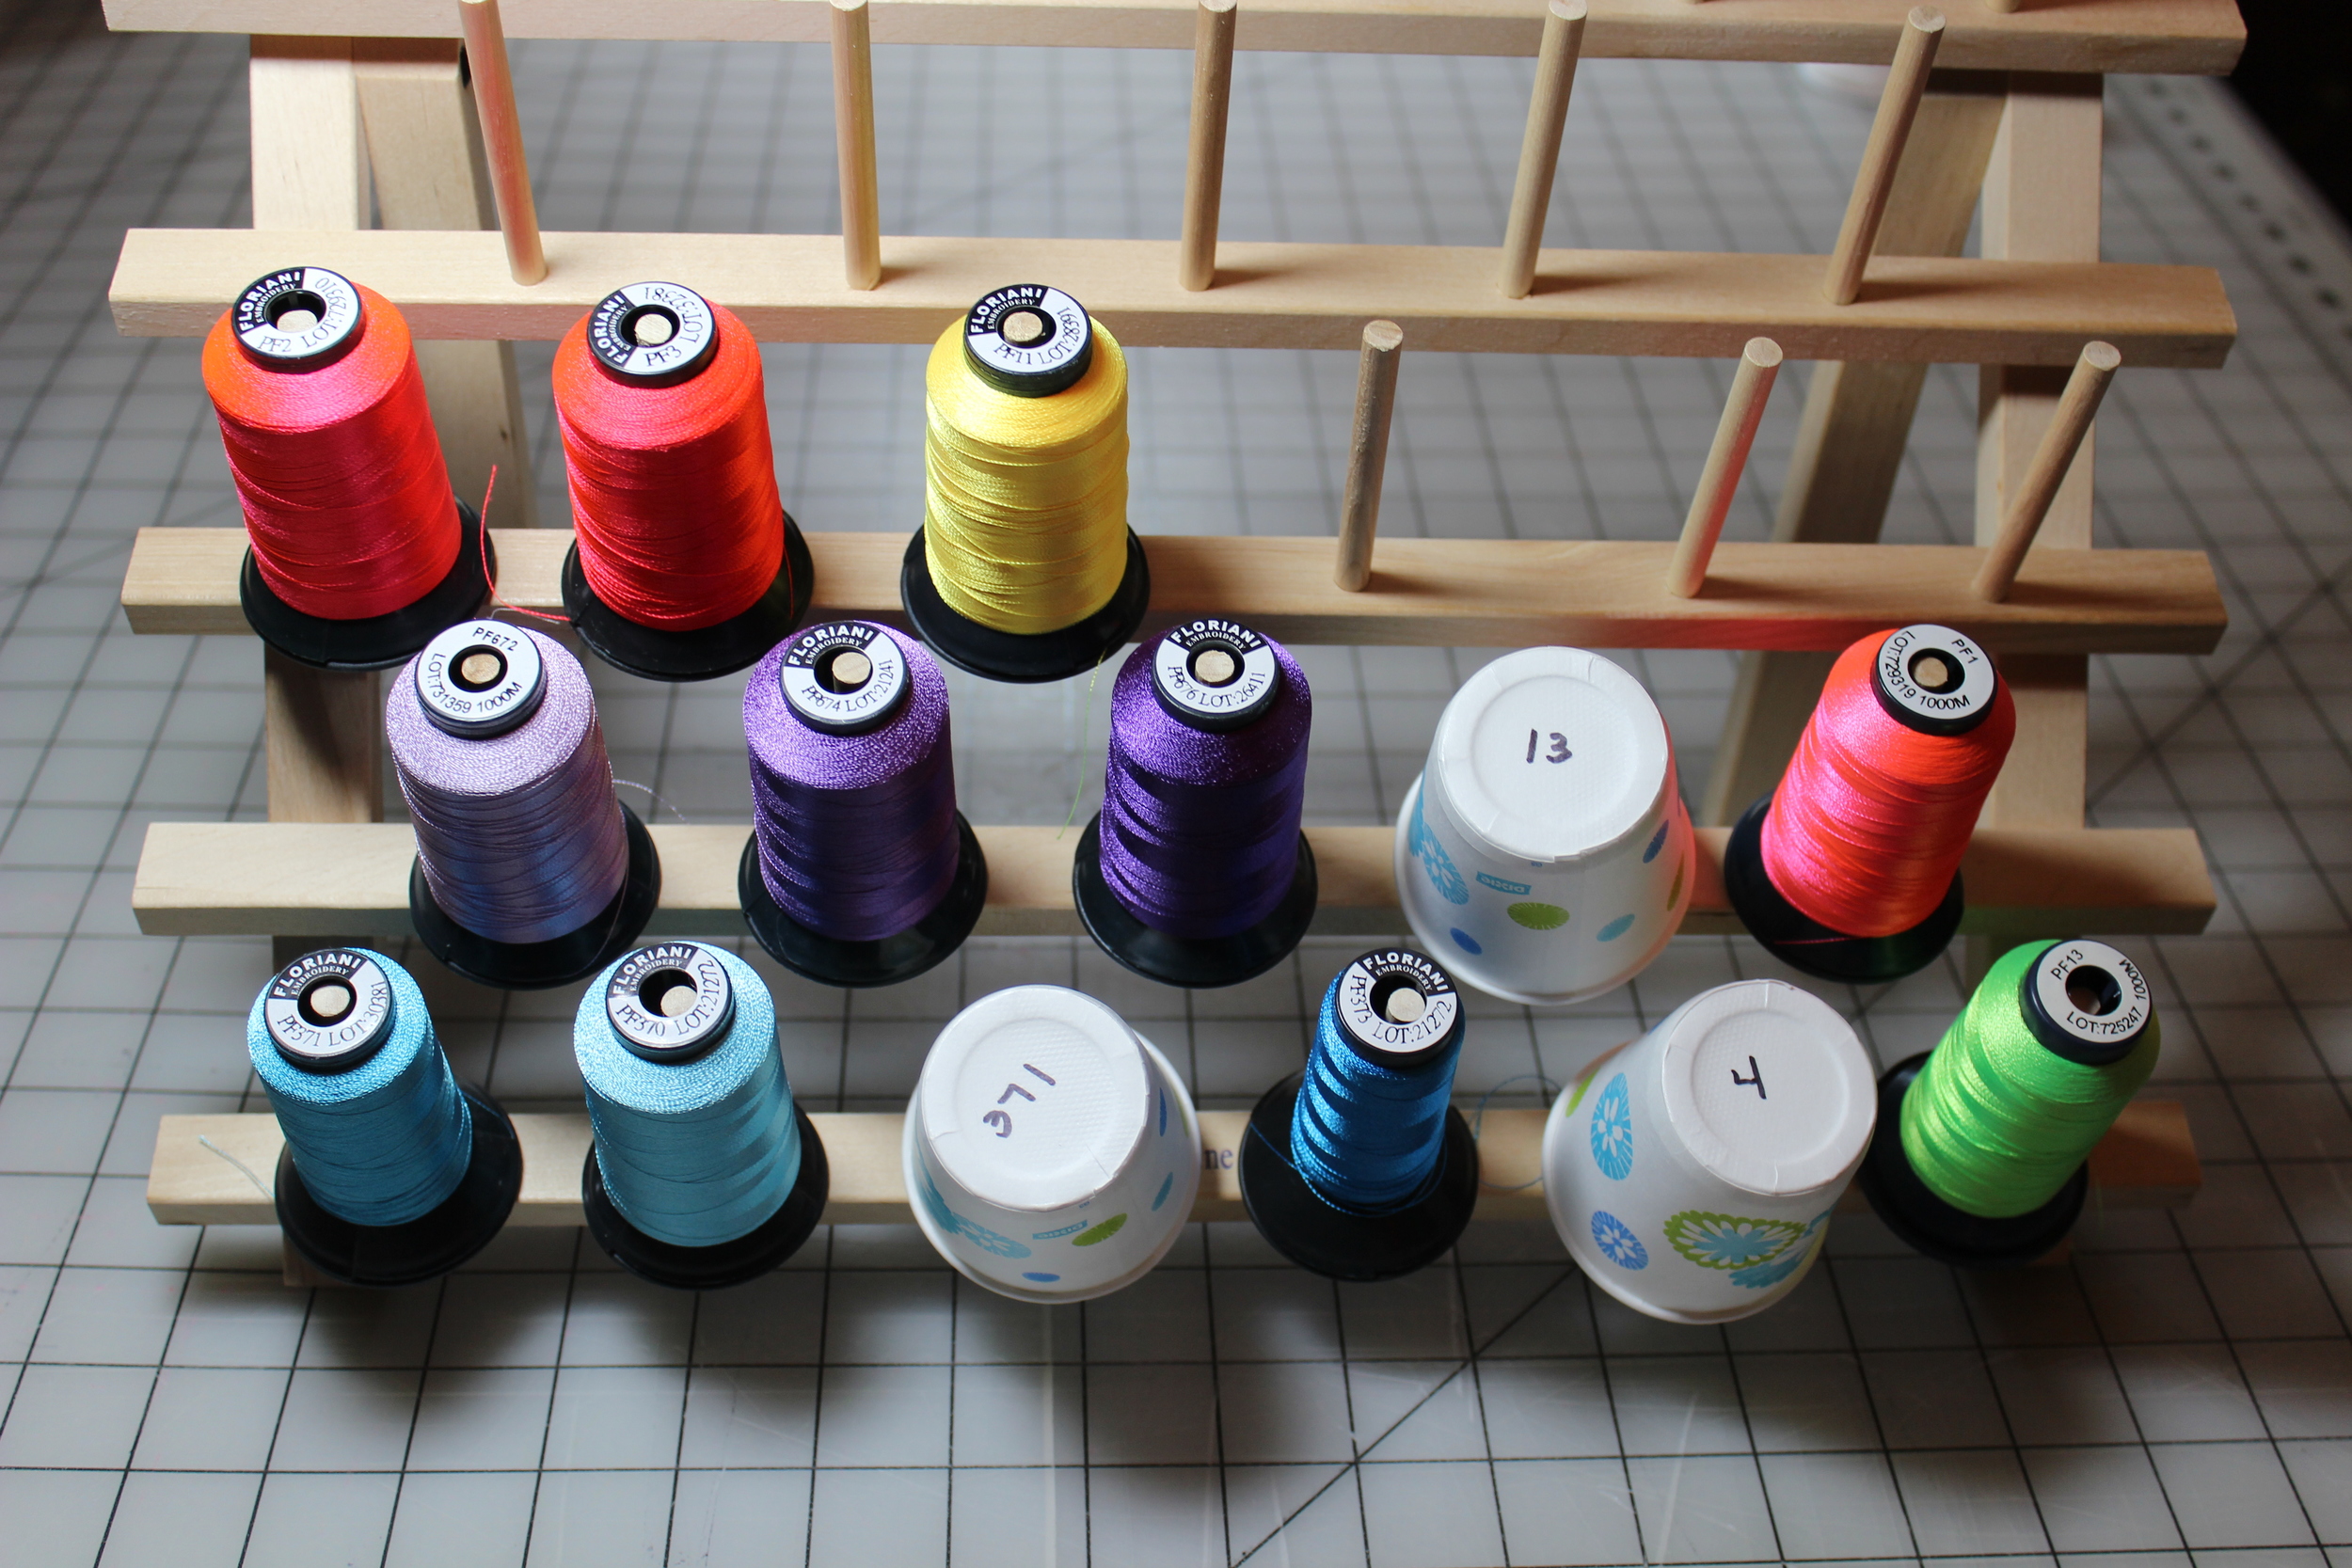
Inevitably, the threads will be used more than once.  There is the dilemma - what to do with that open space.  You could just leave it open, but then you run the risk of loosing track of your placement, or if you are like me and have accidentally purchased the same color twice, you could use the duplicate. However, it never seems to work out that that is the color that is duplicated and you are still left with that gapping hole. Dixie cups to the rescue! 

Those Dixie cups are the best! You turn them upside down and write on the number of the thread color on the bottoms that should be next in order. Voila! An inexpensive placement marker and you will not loose your place again. 

The best part of those cups...they can be filled with your sweet pick-me-up when not in use. 

What is the most unusual thing you use in your sewing room?

Machine Embroidered Flower Headband

One of my college daughters asked me to make her friend a flower headband. Since my daughter also machine embroiders, it was so much fun to be facetiming while looking at machine embroidery designs at the same time. This truly is a wonderful technological age! Who would have guessed that you could see your daughter who lives over 800 miles away and still go shopping all at the same time – let alone, be planning for an embroidery design that will be stitched by a machine! Sometimes it just boggles my mind!

Free Standing Sunflower Beads by Sonia Showalter

Free Standing Sunflower Beads by Sonia Showalter

We settled on a free standing flower design by Sonia Showalter, entitled “Sunflower Beads.”  It is a very versatile design and can be stitched in any color combination. My daughter chose white with a single grey center.  It was designed with a three-color combination – one for the petals and two for the center design – with two parts to the flower.  There is an upper and a lower part of the flower.  The bottom flower has a loop on each side where a ribbon can be threaded through, which is the main reason why we picked this design.  It was cute, the right size and could be simply made into a band by looping them together.  Perfect!

The instructions state, “When completely dry, the flower pieces need to be glued together before stringing.” Ugh! This is machine embroidery! Surely we can do all this in the hoop and skip the gluing phase. There was my challenge!

So here it is.  Here are my instructions for machine embroidering the two flower parts together without gluing them.

For this project, I used Floriani’s water soluble stabilizer, “Wet N Gone.” This product is not the plastic type of stabilizer, but has more body like a true stabilizer.  I used two sheets in the hoop initially and then I added one more sheet in step 8. 

Floriani Wet N Gone Water Soluble Stabilizer

Floriani Wet N Gone Water Soluble Stabilizer

SUNFLOWER BEADS SPECIAL INSTRUCTIONS

STEP 1

Follow Sonia’s instructions to machine embroider all the “bottom” flowers first.  Trim the threads at this time. Wash them and set them aside to dry overnight.

STEP 2

Follow Sonia’s instructions to machine embroider the “top” flowers next. However, stitch colors 1 and 2. STOP before stitching color 3.  If you are stitching several flowers in one hoop, you will have to carefully watch your stitch out and advance your machine manually from color 2 in one flower, back to color 1 in the next flower.

STEP 3

Trim all the threads from the top flowers at this time.

STEP 4

When all the flowers are stitched for colors 1 and 2, advance your machine back to the starting point and then advance it again so it begins at color 3 of the first flower.

STEP 5

Take your hoop out of the machine.

STEP 6

Carefully turn your hoop upside down on something that is approximately the width of the inside of your hoop. [For me, it was a Body for Life for Women book that was sitting on my cutting table just dying to be opened.]

STEP 7

Individually spray the front of each “bottom” flower lightly with Sulky KK 2000, but completely. [I tried using a fabric glue stick, but it was not strong enough to stick the two flowers together.]

Do not use Fabric Glue

Do not use Fabric Glue

TIP: I have a tall, but medium sized cardboard box that I use for spraying with Sulky KK 2000. I put the item in the bottom of the box to spray it and then all the sticky mist does not get onto everything.  I keep the box folded up against a wall so it does not take up any space and it is readily available when I need it.

Sulkiy KK 2000 Spray

Sulkiy KK 2000 Spray

STEP 9

Cut another piece of water soluble stabilizer larger than the size of your hoop and lightly spray it with the Sulky KK 2000. Place it sticky side down on top of the flower sandwich that was just created. This will keep those bottom flowers from getting caught in the feed dogs or any other openings. Finger press this down very securely.

STEP 10

Carefully, put the hoop back into the machine. 

STEP 11

Double check to make sure your first stitch will be color 3 the center of the first flower. (See step 3)

STEP 12

Stitch ONLY color 3 for each flower by advancing the stitch order manually on your machine.

STEP 13

You are now done with the special instructions. You can remove the hoop, trim the threads and wash the away the stabilizer.

The flowers were threaded all together with fold-over elastic and tied with a simple knot to keep it together.

This headband is such a fun spring project.  What will you be making to celebrate spring?

Illuminated Manuscript Quilted Pillow Pattern

Next Saturday, March 19th, is National Quilting Day. I think “National” days are so much fun, but I really like to know about them ahead of time, so a quilted pillow pattern is just the thing to celebrate National Quilting Day next week.  You can accomplish this project in one day and by telling you ahead of time, you can gather your supplies and do it next Saturday – actually on National Quilting Day. Now that is planning. 

Machine Embroidery Designs by Sonia Showalter

Machine Embroidery Designs by Sonia Showalter

Medieval illuminated manuscripts were the inspiration for this pillow. The pillow is a combination of quilting and machine embroidery in gold metallic thread. The machine embroidery designs were from Sonia Showalter and were sewn after it was quilted using the Snap Hoop Monster by Designs in Machine Embroidery. I think another idea would be to embroider actual words in the blank parchment block. 

If you do not have a embroidery machine, do not let that hinder you. The pillow does not need to be embellished or you could even embroider it by hand as hand embroidery is really becoming very popular again. DMC, a manufacturer of excellent embroidery threads, has a page dedicated to the different stitches on their website and there are wonderful YouTube demonstrations just waiting for you to google

ILLUMINATED MANUSCRIPT QUILT TOP

MATERIALS:

1 fat quarter of parchment silk dupioni

1 fat quarter of royal blue silk dupioni (also 1 additional matching fat quarter is needed for the back of the pillow, if you are making the pillow)

18” square of batting

18” square of muslin

CUT BLUE (B) SILK:

B1 = 2 pieces 2.75" by 13.5" for outer border

B2 = 2 pieces 2.75" by 18" for outer border

B3 = 1 piece 4.5" by 4.5" for main block

B4 = 2 pieces 2.5" by 8.5" for stripes off block

CUT PARCHMENT (P) SILK:

P1 = 1 piece 1.5" by 13.5" for inner border

P2 = 1 piece 1.5" by 12.5" for inner border

P3 = 3 pieces 1.5" by 8.5" for stripes background

P4 = 1 piece 8.5" by 9.5" for main parchment block

LAYOUT: The layout is available as a PDF here.

STITCHING ORDER:

  1. Stitch block P3 to each side of block B4.
  2. Attach this new block to B3 on the right side.
  3. Sew P3 and B4 together.
  4. Sew P4 to B4 of this new block.
  5. Attach this new block to the bottom of B3 that was made in step 2.
  6. Connect P2 to the block created in step 5.
  7. Connect P1 to the block created in step 6.
  8. Add B2 to the right sides of the block created in step 7.
  9. Add B1 to the top and bottom of the block created in step 8.

This finishes the creation of the block.  It can now be quilted. I stitched in the ditch to highlight the blue blocks only.

Once the quilt top has been quilted, you would sew it like any other pillow that has piping/cording and a zipper. 

To complete the pillow I also used:

20” matching royal blue zipper

20” square pillow form

2 ¼ yd gold cording 

(also 1 additional royal blue fat quarter of silk dupioni is needed for the back of the pillow, if you did not include it in the quilt top)

_______________________________

When finishing the pillow, Pam Damour’s instructions in her PDF entitled Pam Damour's Foot Notes - Ten Steps to a Perfect Pillow, are fabulous. Take note of her special technique to taper the corners.  This is really important and makes all the difference in making an elegant pillow.  Thank you Pam for sharing this important tip with all of us. By the way, she does have several acrylic templates for sale on her website for tapering those corners.  Pretty clever!

My version of the illuminated manuscript quilted pillow has been submitted to the Second Annual Nancy Zieman Pillow Challenge. The deadline for submissions is March 20th and online voting begins March 22nd, so I will surely be linking to that voting page then. The grand prize is a Baby Lock Anna sewing machine and that would be wonderful to take along when I teach sewing. 


Next Saturday is also National Let’s Laugh Day, so truly enjoy next Saturday.  So what are you doing to celebrate?


Mustache Pillow Pattern

March is National Craft Month and to help you celebrate it is a pattern for a sewn mustache pillow.  Several years ago, mustaches were in vogue. Everything had a mustache on it and funny antidotes were made with “mustache” – like my blog page entitled “Mustache a Question.”

Our youngest son fell for the craze and asked if I would make him a mustache pillow for his room, which you can tell was a while ago since it is so faded, but those are the kind of requests that a mother jumps up and down about – teenage son asking to me to sew!!! It was done in a flash.

When I was recently cleaning my sewing shelves, I noticed that I still had the pattern in my metal sewing box, so it was perfect for sharing with you this month. Hopefully, mustaches are still faddy enough for you to still enjoy.

MUSTACHE PILLOW PATTERN & INSTRUCTIONS

MATERIALS:

¼ yard fabric

Stuffing for the pillow

Pattern to download – Part one herePart two here

Invisible tape to use for the pattern

Usual sewing paraphernalia and a machine (or can be sewn by hand)


NOTES: 1.  Pattern uses ½” seam allowance.  2.  The quarter is for reference.  Please make sure it is the same size as an actual quarter when you print the pattern.

SPECIAL SEWING INSTRUCTIONS for the points on STEP 5

STEP 1 - Wash and dry your fabric because a pillow is always cuddled, so it will need to be washed eventually. Press if necessary.

STEP 2 - Download the pattern above and tape the two parts together by connecting Part 1 with Part 2 by matching the 1A to the 2A and the 1B to the 2B. Then cut out the pattern on the cutting line.

STEP 3 - Place the pattern on the fold of the fabric and cut two from the fabric.

STEP 4 - Lay fabric with right sides together and sew with a ½” seam allowance leaving a 3” opening at one of the widest edges, but not in the middle or an end.

STEP 5 - SPECIAL SEWING INSTRUCTIONS for the points – When you are about 3 stitches away from the point which will be a little over the ½” from the edge – STOP – change your thread stitch length to the smallest possible. Stitch half way from the starting point to the edge then pivot – STITCH 3 stitches – then pivot and stitch to same place that your started, but now on the other side – STOP – change your thread stitch length back to its normal position and proceed with sewing.  DO NOT sew to the point of the mustache and then pivot.  It will not make an accurate point.

STEP 6 - Trim and clip corners and curves.

STEP 7 - Turn right side out and press.

STEP 8 - Stuff the pillow really full with stuffing, pushing it with a long bamboo stick into the points and around the corners.

STEP 9 - Hand stitch the opening closed.

STEP 10 - Enjoy and share on your social media.  Remember if you share this pattern; please reference back to this blog post.

What are you doing for National Craft Month?

In Search of Boston’s Fabric District

Unexpected excursions are wonderful, but when they are with your sister and include fabric shopping, they just could not get any better.  My sister’s husband was taking a business trip from Florida to Boston and graciously invited her to join him. We were nonchalantly texting when she said where she was going. Seriously! Being from Connecticut, I feel like the Boston to New York City corridor is all one state and that she was going to be in my state without telling me. Of course, I invited myself to come up, so she decided what we would do for the day.

Boston Harbor as seen on the water ferry.

Boston Harbor as seen on the water ferry.

Neither one of us had ever been to the garment/fabric district in Boston, yet we are both sewers/crafters who grew up in the Boston suburbs. We had always shopped at the century-old, Saftler’s in Whitman, which devastated us when we found out that they closed. Since I was at home with a desktop computer and she was in a hotel, it was my job to find all the names and addresses of the fabric stores and efficiently map it for the day.

The plaque for the Leather District on South Street

The plaque for the Leather District on South Street

Our first stop was in the heart of Chinatown, which coincides with that of the garment district. On our way we passed the sign for the leather district, but when we googled it on our phone and searched at each entrance way, we could not see any sign and nothing gave any indication that they were industires still left in the leather district. We could see that there were many floors that could have contained unlabeled companies, however, they all looked dark and uninhabited, so we moved on through Chinatown.

Chinatown in Boston

Chinatown in Boston

Van’s Fabrics was our first stop.  It is located on 14 Beach Street with an entry that requires being buzzed in. It is a rather small shop that takes advantage of every inch of space. As befitting its location, it revels in Asian prints and silks.  These are truly one-of-a-kind bolts of fabric. We each had our secret list of fabrics that we wanted to spy or shall I say truthfully, buy, but they were not at Van’s Fabrics. Those were for another day.

Van's Fabric 

Van's Fabric 

On the corner of Beach and Harrison, we see the remains of another fabric store, but it has long been closed.  We surmise that this is Harrison Textile on our list and cross it off.

Harrison Street was the home to Grey’s Fabric and Notions, but I had seen on the web that it was permanently closed, so we did not bother to track it down. As it turns out, it was purchased by Mercer’s Fabric and just recently moved to 121 Charles Street. Judging by its website http://mercersfabric.com, it looks promising and carries many modern pattern designers and fabrics. I hope the new owner, Natalie Mercer, does well, as it looks like Boston is need of a new and upcoming fabric store.

On to Chauncy Street to look for Fabrics for You, but it also did not exist.

Dido for Clement Textile and New England Textile on Chauncy Street.

Winmil Fabrics

Winmil Fabrics

Finally, an open shop…Winmil Fabrics at 111 Chauncy Street. The outside looks promising with large windows and a comfortable entrance, but inside is disappointing.  It looks as if it is ready to close any day.  The shelves are bare. Remnants are hung on hangers on clothes racks that are pushed far apart to make it look like there are more choices than there are. We walk around thinking that maybe that special fabric will just be waiting for us, but our hopes are dashed as we round the last corner, but feeling that it probably was an admirable store in its day.

Winmil Fabrics

Winmil Fabrics

Windsor Button Shop was just around the corner on 35 Temple Street, but as you can probably guess by now, it was closed too.

The former Windsor Button

The former Windsor Button

Well that changed our plans.  We had exhausted our entire list of fabric shops and it was not even lunchtime.  We discussed taking the “T” and visiting other shops, but decided that we would just lesiurely walk to Faneuil Hall for lunch and then of course, dessert. We would shop afterwards.  Well, as sisters do, we talked the afternoon away and had a thoroughly marvelous time just enjoying one another’s company. Then in the evening, on to the North End to drool over all the bakery shops that we could have eaten at, only to end a great day with a truly authentic Italian dinner with her husband, making it a fabulous memory.

So Boston, where are your fabric stores? I would love to know where you Bostonians shop for your fabric. 


Replicating Handwriting with Floriani Total Control

Most machine embroiderists get special requests to embroider. This one was a special sentiment of love written on a paper towel that the one gifted wanted to treasure for a lifetime. 

To make the project lasting and as cuddly as the sentiment, I chose a natural soft raw silk (noll) fabric for a rectangular flanged pillow shape that would give the appearance of paper towel. It was just the project to get me kick-started on my Floriani Total Control software. 

Floriani Total Control could not have been any easier to use.  Considering this is the first time I ever opened the program and was able to produce a beautiful project quickly thereafter, I would say it rates an A+.

The software has an Autodigitizer Wizard that with a click of a button I was able to download a jpg file of the paper towel and it did all the rest of the work.  I am telling you that I did nothing further, but to click through the sequence of the Autodigitizer Wizard. 

After practicing stitching on a piece of similar cloth it looked wonderful. I am in love with this program and can not wait to use it again. 

To complete the project, I sewed the inside seams with a straight stitch and finished the edges with a zigzag knowing that noll will fray over time and especially when washed. 

How have you used the Floriani Total Control Autodigitizing Wizard?

The Best Machine Embroidery Tightening Tool

Every occupation has it tools and machine embroiderists are no different. Just like hand embroiderers, machine embroiderers use hoops to keep the fabric taut. As hand embroiderers know, sometimes it can be quite difficult to tighten the screw to make the fabric as tight as a drumhead. This precision can make all the difference in whether the embroidery design is a high quality or just fair.

The embroidery machine manufacturers know how critical this is and want their superior machines to always shine even when the embroiderist may be lacking the strength to tighten that hoop, thus they have been providing hoop screwdrivers for years.  However, this last upgrade produced a new device that was quite innovative. They now provide new embroidery machine owners with a multi position screwdriver. 

IMG_1083.JPG

The screwdriver technically has three positions, and all three positions can be used to tighten the the hoop, but only position “3” grips the screw and does not allow it to slip, so this is the best option for tightening the hoop.

Position "1" is designed primarily for tightening the needle or the feet.

Whereas, position "2" ideally was made for the screws in the metal plate around the feed dogs. 

The previous screwdriver looked like a flat piece of metal. Inevitably it would slip while tightening and was difficult to get a grip. However, the old screwdriver is still great for all the other functions, because it gets into the small spaces so nicely.

You can own the multi position screwdriver without having to own the newest embroidery machine. They are fantastic. No more sore fingers! 

This new screwdriver is a bit pricey to buy at the retailer, but it is worth every penny. 

What do you think of the multi position screwdriver for embroidery machines?

How to Find a Machine Embroidery Thread using an iPhone

Sewing Machines are so sophisticated today.  Back in the dark ages – well at least when my husband bought my first sewing machine as a wedding gift almost forty years ago (He was so loving and thoughtful. How could have he have known it would lead to this.), sewing machines were much simpler to repair. Everything opened up and came apart. Even the manual told you how to repair it.  You were just expected to repair it yourself.

Today, the sewing machines are so complicated.  They are computerized just like our modern cars. The sewing manual is a tome and it does not even address repairing it. I have asked my beloved sewing machine salesman/owner/repairman if he would tell me how to open it up so that I could make sure that I did not have an illusive thread floating around when it breaks, but he assures me that I would forfeit my warranty and that I should just bring it in any time I have an issue.  Who wants to forfeit that incredible warranty and yet I do not want to drive an hour and fifteen minutes to his shop (yes, his price was well worth the savings, service and training).

Embroidery Design by Sonia Showalter

Embroidery Design by Sonia Showalter

As I was embroidering the muslin bags to keep our church’s baptism towels from getting dirty while they are stored, that upper thread broke for no apparent reason.  It sprang up into the upper thread tension area and balled all up.  I could see its gold little head peeping through the little crack. I searched for my tweezers. UGH! One of the boys took them.  I hid my eyebrow tweezers and did not think they knew to look for my sewing tweezers, but at least they know not to take those scissors! Of course, after realizing that the boys uses them, I decided to just buy new ones and never ask what they were used for because I really do not want to know.

Thread Ball Discovered!

Thread Ball Discovered!

Thankfully the edge of the thread was barely peeking out of the crack and I could pull it ever so gently by hand. Oh, so tenderly. I knew it could break inside. I pulled. It slowly began to unwind. Not what I wanted.  I wanted it all to just lift up and stay together. Gentle! Gentle! It was coming. It broke! I could see there was some still in there. Nothing would fit inside the crack that had the ability to grab. I did not, under any circumstance, want to break the plastic casing. It was not worth it. 

Using the iPhone to look up the in the upper tension area to see the thread ball.

Using the iPhone to look up the in the upper tension area to see the thread ball.

Modern technology could help me out, but how? I had to think like a surgeon.  I wanted to look inside and magnify it. If I used my iPhone to look under the plastic casing and it would show me where the thread was and then I could use it to look inside the crack to see if it was still there by magnifying it. It worked. I finally got it out and now it is running just fine. 

How has your iPhone gotten you into places you never thought you could see?

Grandfathers and Quilts

What do grandfathers and quilts have in common? I am sure there are stories out there of grandfathers who quilted, but they have got to be far and few between. My grandfather was born October 12, 1905, and in his day, men did not sew or quilt or do any of that women stuff, as he called it. I can hear him saying in his deep gruff voice, “Men were men then.”

Walter & Ruth Russell June 2, 1930

Walter & Ruth Russell June 2, 1930

Quilts from the turn of the century, were usually utilitarian. They were to be used and not for show. Well my grandfather took that to its fullest meaning.

It was a brisk autumn day. We were all satisfied from the Thanksgiving feast the day before. The heat was on inside their cozy little apartment. Grammie, Mike and I were all snuggled together on their elegant handmade couch listening to Poppy in his stuffed chair tell one his enthralling stories about living during the turn of the century. My fingers were busy appliqueing them a felted Christmas tree skirt with the nativity scene wrapped completely around the skirt. It had taken me every night for months to get to this point and I wanted to finish their Christmas gift quickly as they were putting up the Christmas tree that weekend.

Poppy had been telling many stories all morning. We had eaten leftovers for lunch, and as we listened to more stories, we were all getting a little weary. We just sat in the silence for a few moments. Eyes seemed to be fixated on my sewing, but I was relishing the opportunity to sew uninterrupted. Out of the blue, my grandfather started crying and said, “One minute, I will be right back.” That minute seemed like an eternity as we could hear him moving things around in the basement. What could have stirred him to tears?

When he came back up the stairs, he was carrying a crumpled trash bag. Before he opened the bag, he stood and told another story of his grandmother. How he would sit for hours and watch her make quilts, but that he never thought about how tedious the job was or what a labor of love it was until he was sitting there watching me sew by hand. He was overcome by the fact of he had taken his grandmother’s hand quilting for granted.

Then out came the treasure…my great-great grandmother’s quilt. But his story had to continue before he laid it out before me. He was sobbing like a baby as he apologized to his grandmother and me. He had been given the quilt as a young boy and used the quilt all his life, but not to keep him warm, as one would expect, but as a drop cloth! A drop cloth! He loved using it to paint and work under his card because it was so absorbent and padded. It was tattered and covered in paint. (Maybe his real aversion was the fact that it was a sunbonnet Sue quilt. I honestly cannot imagine him ever using this.)


The applique was very simple stitching, but it was mine - holes, paint and all, and I love it dearly. It is a treasure that no one can replace. That was Thanksgiving 1979, in Livonia, MI and my grandfather passed away shortly after that. I am so glad that he thought to gift me with that quilt and its story before it slipped into a memory that never would have been shared. It is the tears that make it so precious.

There are other such quilts out there that have real life stories and have real life splattered all over them. What is your closet quilt story?

How to Hoop Plush Towels

Machine embroidering plush towels can be a challenge, as they are very difficult and sometimes impossible to hoop in a traditional manner.  No matter how hard you try, when you put that thick terrycloth between those two rings, it pops out when you fasten it down. If your terrycloth is a thinner grade or has been washed many times as my test sample was, then it is not a problem and can be hooped like other fabrics.

Font by Sonia Showalter

Font by Sonia Showalter

There are many ways to conquer this problem, but here are the three easiest. All three options use a sandwich approach, which consists of a bottom layer of water soluble stabilizer (this differs depending upon the method chosen), the towel itself, and then the important water soluble topping stabilizer which serves to keep the pile of towel down so it does not get caught up in the needle or the foot as it travels across the design, but it also keeps the pile down while actually embroidering so the design is very uniform. It really makes a difference by using this topper. It takes the embroidered finished product from amateur to professional. 

The first option for hooping the towel sandwich is to purchase the Snap Hoop Monster from Designs in Machine in Embroidery, if you have the time and the funds for the purchase. This magnetic wonder solves all your problems and is the easiest solution.  You lift the top magnetic hoop, line up your towel sandwich of water soluble tear-away stabilizer, towel and topper, then put the hoop back on top. Presto, no further issue.  It is an amazing invention, by a very creative lady, Eileen Roche. I have the 5 x 7 model and it is fantastic.  It is worth every penny, but I chose not to purchase the largest hoop, which I am now regretting.  It is on my wish list for sure. The design I chose for these towels is larger than the 5 x 7 hoop. I could have opted to split the design in half and then hoop it twice, but I decided against this method as I thought it would take me longer in the long run. 

The next two methods are similar in that you hoop a tacky or pressure sensitive stabilizer instead of the water soluble tear-away used with the Snap Hoop Monster,  in between the two rings and then stick the towel to the stabilizer. This is another amazing product that I do not know how we lived without.

Wet N Gone Tacky Stabilizer by Floriani

Wet N Gone Tacky Stabilizer by Floriani

It is easiest to hoop the stabilizer before removing the protective paper as it is very difficult to hoop it tightly since it will stick to the top hoop and not allow you to readily tighten it. Also, it will leave a residue on the the hoop. This process solves both of those issues. Once the stabilizer is hooped, you lightly score the paper with scissors being careful not to push too hard as it will cut through the actual stabilizer and you will need to start all over again.

Thicker scissors seem to score better than thinner ones. Maybe I just apply less pressure.

Thicker scissors seem to score better than thinner ones. Maybe I just apply less pressure.

Once it has been scored, remove the protective paper being careful not to touch the stabilizer.

Finger prints and score marks on the tacky stabilizer.

Finger prints and score marks on the tacky stabilizer.

Then align the towel onto the stabilizer with both rings of the hoop under the towel.  It seems counterintuitive, because it looks like the towel is just floating on top of the hoop, but with these next two steps it works really well and this is were the methods differ.

This towel has a border that can easily be used to line it up with the edge of the hoop.  You can see the hoop placement in the right corner.

This towel has a border that can easily be used to line it up with the edge of the hoop.  You can see the hoop placement in the right corner.

This topper must be secured to the sandwich. It can be done in many ways such as basting it by hand or machine to the towel before it is attached to the sticky stabilizer or it can be done after it is attached.  Most machine embroiders opt to baste after and use the built-in basting feature on the newer machines. With the click of a button it adds the basting lines and knows to sew it before the design begins. 

On the Baby Lock machine, basting is simply added automatically at the beginning of the process by the press of a button.

On the Baby Lock machine, basting is simply added automatically at the beginning of the process by the press of a button.

The hard part is keeping it secured while it is basting.  I have seen some embroiderists hold it in place with their hands, but I strongly do not recommend this method.and yes, I have tried it.  You know those times when you are in a hurry and you want to skip a few step.  It never pays.

The second method is to pin it in place, but it is difficult to get it taunt and to especially get the pins to go down and back up without loosening the stabilizer. 

Topping pinned to the towel and underlying stabilizer.

Topping pinned to the towel and underlying stabilizer.

The third method is the method that I chose.  Use a tacky water soluble stabilizer on the bottom, with the towel in the middle and then spray the towel with a temporary adhesive (I used Sulky KK 2000). 

KK 2000 Temporary Spray Adhesive by Sulky and Water Soluble Topping by Floriani

KK 2000 Temporary Spray Adhesive by Sulky and Water Soluble Topping by Floriani

Once the towel is sprayed, I affix the topper directly to the towel and smooth it out by pressing in the middle first then working out and down firmly, so all the air bubbles are removed and it creates a nice tight suction with the towel. If you misplace it, the nice part is that is lifts right up and you can reposition it, starting all over again.  

The basting keeps the topping in place and taunt while the design stitches.

The basting keeps the topping in place and taunt while the design stitches.

Now you are ready to baste and begin your beautiful design on your towels.  This Sunday our church is having a baptism that will now have six embroidered towels for the occasion.

Fleur de Lis Capital and Lower Case Alphabet with the Baptism Cross Designs by Sonia Showalter

Fleur de Lis Capital and Lower Case Alphabet with the Baptism Cross Designs by Sonia Showalter

What method do you use to machine embroider plush towels?

So Many Books, SEW a Bookmark,

Oh, we have so many books in our house.  There is not a room without a book. We even have so many bookcases that every time my father comes to visit (a former city inspector), he warns me that houses were not built to withstand that much weight in any one room. 

In our house it is forbidden to write in a book a dog-ear one, so with so many books, you know that most of us love bookmarks too and are always on the hunt for that favorite one. 

Machine Embroidery Design by Embroidery Library

Machine Embroidery Design by Embroidery Library

This darling bookmark was so cute that I could not resist buying the design from Embroidery Library.  It is an in-the-hoop design that stitches up so quickly. 

The best part of this project is that it did not cost anything to make, other than the design which was on sale through one of Embroidery Library's fabulous sales, as the fabric was from my stash (well, stash of old sheets, not yardage) and the thread was from previous projects. But, I must be honest, when I want to close a book, I am usually in a hurry because someone wants my attention and I do not take the time to place the page neatly into the little corner pocket and I wind up just sticking it in the book like a normal bookmark. At least it is better than grabbing whatever is nearby. You name it, I have used it for a bookmark.

In-the-hoop Bookmark

In-the-hoop Bookmark

What is the funniest thing you have used for a bookmark?


Machine Embroidered Greeting Cards or Just Stitched?

One of my college girls has a birthday coming up and her sister is at the same college, so when I was preparing a birthday box, of course, I had to make a second one for her sister. I had already purchased a set of birthday cards to be sent on just the right day to arrive in time, but I wanted a card to go in the box too.  Initially, I thought I would do a printed birthday banner, but my husband did not look like he was going to give up the printer any time before I wanted to mail the package, so plan “B.”

Michael’s had a wonderful deal on gold-foil cards – 60 cards for $5. That is eight cents a card.  You cannot get them that cheap anywhere! They are a very nice quality, not at all flimsy like I thought they would be. They looked very young and just what the girls would like. However, I wanted to take them to the next level – embroidered cards.

Gold-Foil Note Cards from Michael's

Gold-Foil Note Cards from Michael's

Machine embroidering on paper was one of the first things that I tried when first received my machine.  I am not sure why I was so intrigued that I put it above so many other fabulous features, but I did. I had hooped a piece of medium cut-away stabilizer, sprayed adhesive on the back of the paper and ta-da! It worked beautifully.  Somehow, I had enough common sense not to use a dense design, so it did not cut through the paper and make it pop out like a cut-out.

Stitched Alphabet with Guidelines and Jump Stitches

Stitched Alphabet with Guidelines and Jump Stitches

This summer, I was experimenting with the standard built-in stitches on my sewing machine, as I wanted to know which ones were compatible with the sewing machines that I was going to teach   on at the Fairfield Library (also see Fairfield tag below). During that process, I played with the built-in alphabet characters.  These are different from the actual embroidery characters, because they are generated using the utility function for stitches and the foot pedal. It does not use a hoop or an embroidery foot. It does not sew automatically, the foot pedal must be engaged and I must guide the fabric. This is truly a sewing function, not embroidery and yet they are alphabetical characters.

Reverse Side of Stitched Alphabet with Jump Stitches

Reverse Side of Stitched Alphabet with Jump Stitches

These built-in alphabet characters are so much fun and they are so quick to produce a word and the best part is that they can be done without hooping or stabilizer.  They were just what I needed to make these cards a little more personal. Besides, the birthday girl is the only one in the family who knows how to machine embroider and I know how much she loves machine embroidery.

Finished Greeting Cards

Finished Greeting Cards

So the question is, what do you consider the built-in alphabets – embroidery or stitching?

How to Replicate a Monogram Placement

Two of my college daughters adore monogramming everything.  Can you tell that these northern women are attending a southern college? Those southern girls have influenced them and for the good. Well, they do get teased about that southern drawl that creeps in when they first come home, but that accent does not last long.

Thankfully, one of them loves machine embroidery too and usually monograms her own, as well as her sister’s garments. As to be expected, mother and daughter have different techniques when it comes to embroidering, but we do compliment each other.  Things she does not like to do, I love, and vice versa.  She usually does my trimming, especially on applique (love those young eyes) and I usually do any precision placement.

This time the girls wanted to replicate an appliqued monogram and its placement on a t-shirt, but in different colors. Normally, I would have kept notes as to where I placed it on the t-shirt, but my daughter had done it and documenting is not in her vocabulary. Sure we could have just put the t-shirt on and re-measured it, but there was so much discussion as to whether it would be exactly in the same spot, so mom to the rescue.

The trusty light box came in handy in lining up the two t-shirts.  The monogrammed shirt was placed on the bottom and the other shirt on top, and then I found the center of the design by using the centering ruler by Designs in Machine Embroidery.  It comes in an Embroidery Tool Kit several other great measuring devices (no this is no paid endorsement). Once the center was found, it was all down hill from there. I put on my trusty snowman-centering sticker and then my daughter was able to center the design on the embroidery machine.  The t-shirt crisis was saved with a light box. 

The original t-shirt and another larger version on the back of the t-shirt

The original t-shirt and another larger version on the back of the t-shirt

How have you replicated a machine embroidery design for which you had not kept notes? 

Army T-Shirt Repurposed

Re-purposing is so much fun and so green.  It is so me. I love to use things that would normally be discarded and use them again, but it is even more fun when it is for your son.

We are so proud of our oldest son who was a drone pilot in the Army.  While he was in flight school someone made these embroidered t-shirts for them. 

He came home for a transition time to the civilian world and when he was preparing to move out, he asked if anyone wanted this t-shirt.  My first response was to inspect the quality of the embroidery, the type of stabilizer and of course, the last stage trimming.  You know, I gave it once over. Then I gave him a hard time because he told me that he would never wear an embroidered shirt.  His come back was that he never did and said, “Mom, did you ever see me wear that shirt?” Well, okay, but I could not throw away someone else’s embroidery and a memento at that. The easiest solution was to make a pillow.  To my surprise he loved the idea.

The t-shirt surprised me though when I was planning what size pillow to make it.  The design was really tucked in the upper corner, very close to the sleeve.  A rectangle pillow would do the trick by offsetting it a little bit in the upper corner as planned; it would look like it was meant to be there.

The embroidery needed as much room as possible so I used the rotary cutter and ruler to make the first cut as close to the neck as possible. 

Then I fussy cut the sleeves out. I could have cut them out first, but by leaving them in tack, allowed me to keep the shirt front and back straight and lined up for that first cut.

After the sleeves came out, I cut down one side and cut the remaining three sides on the front and back. I could have cut the front with the back by keeping them together, but when I had measured I noticed two important things.  First, that the back was larger than the front. Secondly, that the front was not going to make a 12” + 1/2” seam allowance by 16” + 1/2” seam allowance to fit the pillow form that I purchased. I decided to make the front as big as possible 12 ½” by 16” and add the extra seam allowance to the back.  I knew that no one would notice that the seam was slightly pulled forward. The corners were rounded so this knit would not pucker when squared and it would give fullness where the polyfil was lacking, since it did not have the material for a flange or any other time of edging.

This pillow was just to be used as an accent in his bedroom that was grey and with the t-shirt material so flimsy, I opted out of not using my standard zippered closure for a pillow. 

If the pillow was dirty, I just assumed that the pillow form would be too and it was small enough to wash the entire pillow in the machine. Of course, that was the first thing my son pointed out. “Mom, where’s the zipper?”  Technically, that was a good response.  It means we as sewers have done our job well when our family notices when we cut corners. What has your family noticed?

How to Machine Embroider with Metallic Thread

We all have our opinions.  You ask ten people a question and you will get ten different answers; even if they agree, they will answer it differently. Well, how to machine embroider with metallic thread falls into one of those controversial areas that generates lots of opinions and most machine embroiders love to share their thoughts.  However, many of them are not pleased with their metallic thread process and are always on the search for that magic way to handle the trickiness of metallic thread, so here is one more opinion on the matter.

The experts seem to all agree on the basic standards for handling metallic thread:

1.    THREAD - Buy good quality thread (always a given with machine embroidery).

2.    NEEDLE - Use a large eyed needle, usually 90/14.

3.    DESIGN - Make sure the design is not too dense. If it is, consider using regular thread underneath and using the top stitches with metallic thread.

4.    SPEED – Slow the speed to the lowest setting.

Some machines need to have their tensions adjusted, but most modern machines, do not this coddling.

When I was thinking of writing this blog, I did a little research beforehand to see if I could find the name of a device that someone told me about that handled metallic thread and found this YouTube on how to determine the quality of metallic thread.  It boils down to whether the thread loops or drops neatly into a “U” shape when three yards are released from the spool.  Since metallic threads by nature are metal, they are going to retain their “spooled” shape when released. I have some very expensive, trust-worthy threads that do not loop nicely, but I would not dare call them low quality.

Another criteria for quality metallic thread that I have heard and read about, is whether or not it is smooth.   Once again, this appears to be a matter of opinion, because some very reputable manufacturers produce metallic thread with slubs.

There is a net on the market that you place around the spool that slows the thread down from unraveling. This is a very popular method of handling metallic thread.

The part that seems to be in contention is how does the thread come off the spool when it is embroidering. Does it feed horizontally or vertically? In other words, do you embroider with your spool standing up or lying down?

Metallic thread must not under any circumstance have any bends or kinks in the thread. The ideal is to make sure that none are created during the embroidery process while allowing it to feed off the spool slowly without looping.

HINT:  I stand my spool up horizontally and before I begin to thread it, I place the thread through a felt washer. 

The felt washer works as a light weight and straightens the thread.  Think of taking the thread off the spool and running your fingers down it before you embroider. The process straightens the thread.  The same idea works with the washer.  It is putting a little pressure on the thread to straighten it and a little bit of tension to keep it straightened

Felt washers are standard equipment in most sewing boxes that come with the machines. I use one that came with my Baby Lock sewing machine for my alternate spools.  You can see this clearly in the pictures. Look how beautiful the thread comes off the spool – nice and straight!! That is just what we want to accomplish so the thread does not loop and kink.  This method allows me to embroider so successfully – no thread breaks!!!

However, this felt washer is just a tad too big and every once in a while it will get wedged between the spool and the pedestal next to it.  I really should make one for this purpose, but until then, I have been happy with just one or two breaks per project.

Recently, someone told me that there is a device that was developed just for metallic thread and it allows the thread to flow off the spool just perfectly, but I have not seen it and the person could not remember its exact name, so if you know of this well-sought after device, or if you have your special method of handling metallic thread, please post a comment here.


Built-in Camera Features in Embroidery Machines

Machine embroiderers have sophisticated computerized sewing machines.  That is just the nature of machine embroidery.  In order for the machine to embroider, it needs that assistance of a computer to direct all those minute little stitches to the perfect place on the fabric to make the intricate designs. Many of these machines can function as a standard sewing machine and some are dedicated embroidery machines. Just as sewing machines have different levels of technology, so do embroidery machines.

The higher-end embroidery machines have built-in cameras. These cameras can take a picture of your hooped fabric and place the needle just where you want it to begin.  Maybe it is on the edge of a princess seam on a garment or inside the design on the fabric. 

The machines also have the ability to center the design so that the embroidery begins exactly where you placed the centering sticker. This is great when you are placing a logo or design on a shirt pocket. You know exactly where you want the design to be centered. In my machine the sticker is called a snowman. The smaller top allows the computer to know the top from the bottom – ingenious!

Even though I have been using both of these features for years, it still never ceases to amaze me when I use them. I love watching the camera scan the fabric and then show me a picture. The process is really something that you need to see to believe and yet Youtube does not seem to do it justice. If you are curious to see how it works, here is a link to a YouTube done many years ago for the Baby Lock Ellisimo (no I am not endorsing this product).  It is a seven-minute video.  After two minutes it starts with the positioning of the snowman and a little after four minutes it shows the camera-scanning feature.

https://www.youtube.com/watch?v=y21X6MTvqPs

Even with both of these features, believe it or not, many times I still try and center my design in the hoop, not using the camera features.  When the storeowner that sold me my embroidery machine heard that fact he just shook his head.  He could not imagine why anyone would not use that feature. Well, let me give you my two main reasons for my insanity.

1.    Most times it is because my design is so large that the design is right next to the edge of the embroidery hoop.  If my positioning sticker (aka as my snowman) was miss-centered by just an eighth of an inch, the computer would tell me that it cannot be sewn and that I would have to re-hoop my design.  This would be so time consuming. It is better to start with it in the middle – completely aligned.

2.    Sometimes (okay, many times) I am just being frugal.  I want to use the smallest hoop possible so that I do not have to use too much stabilizer. However, my machine thinks that the design cannot be moved within the hoop just like in the first scenario and I get the same error message.

Hooping is the most time consuming part of machine embroidery and probably the least appreciated step. Yet this step is so vital to a beautiful piece of embroidery.  It can make or break the final outcome. Sometimes an item needs to be hooped several times before it is just right, but all the time spent in this process is well worth it. The camera really is an excellent resource that saves lots of time in this step, if we use it. Maybe I will rethink being so frugal as my time is as important as the cost of stabilizer and save my hooping stress for just the large designs.


Going from Ready-Made to Unique

Buying garments and accessories today is so ordinary. You can walk in a mall and see several women with the same item and their style is all so similar. Talk about cookie-cutter. I really think that is why I sew and machine embroider. While my style may not suit yours, it is unique.  I can craft it just the way I want and the best thing is that my garments fit my particular body measurements.  You cannot get that in your local department store or even at a high-end retailer.  They must accommodate the shape of the majority.

Pashmina scarves at one time were quite unique and not very many women could afford to buy them, but today it is a different story. Amazingly, in New York City, the street vendors sell them for as little as five dollars.  Sure they may not be the highest quality as the ones of old, but they are still beautiful. While I am so very thankful that this is the case and that I can own not just one, but many, it does pose a bit of a problem when you want to be individualistic. 

However, in five minutes, the embroidery machine can transform a common pashmina scarf into something truly one-of-a-kind. 

Swirly Initials Font by Anna Bove Embroidery

Swirly Initials Font by Anna Bove Embroidery

Anna Bove Embroidery has a full selection of machine embroidery fonts.  Her specialty is beautiful older styles like Victorian and art deco, but this swirl initial is quite modern and appeals to the younger generation. My college daughter loves it and I have had several people ask for it once they saw it.

Swirly Initials Font by Anna Bove Embroidery

Swirly Initials Font by Anna Bove Embroidery

The thread can make all the difference in how the design looks.  Here it is quite subtle.  The thread is a silver metallic by Floriani.

Swirly Initials Font by Anna Bove Embroidery

Swirly Initials Font by Anna Bove Embroidery

It really pops with a contrasting color such as black or like this navy blue with gold metallic on a white silk scarf. It all depends upon the individual's personality (especially if it is a gift), what it will be worn with and its purpose - warmth, attention grabber, subtle color, etc.

Swirly Initials Font by Anna Bove Embroidery

Swirly Initials Font by Anna Bove Embroidery

Always be as unique as you are!


Sewing Camp - Project Four of Four

Four days of sewing. What can you accomplish in four days? 

The teens at the Fairfield Woods Branch Public Library accomplished an incredible amount in the their four days.  Most began with no sewing experience at all and by the the end of four days they had received their driver's license from the library's sewing studio and sewn four projects: rice heating bag, round cuddle pillow (so cute & soft), pajama bottoms, and small zippered bag.

Many sewing techniques had been acquired to get to the point of being able to make these four projects.  They had sewn straight seams, enforced faux serger seams, sewn with plaids, sewn with a napped fabric, hand sewn a button onto their pillows, sewed curves, clipped curves, sewn an elliptic casing, and then to finish they learned to sew a zipper.  That is amazing in four short two hour days.

The most amazing part of this fourth day was the way they all soaked up the project instructions with needing very little guidance.  They could see it!! That is such a big part of sewing - being able to see how it is all going to work together. It is a practical puzzle. 

The zippered bags were made from repurposed blue jeans and men's dress shirts. The best! I love repurposing and these fabrics are a dream to work with  - no slipping. We started out with 4 pieces of fabric that were 9 1/2" by 6 1/2" and we used a 1/2" seam allowance.  The only cost involved was a 9", but the library had many of them donated and they purchased a roll of red zipper tape from eNasco. They are so economical when you need to buy in bulk. We also added an optional 1/4" red grosgrain ribbon for a zipper pull.

The construction of the bag is so simple and you can see the instructions at The Purl Bee. While the idea and method were my own, as with all the projects, but he pillow, I wanted some clear pictures with instructions to provide the library when I presented my proposal.  The clear explanation with pictures at The Purl Bee are great, just what I wanted.

This bag is so versatile and can be used for so many things, but from what I heard from the teens, they will be using it as a pencil bag when they return to school. 

How will you use your bag now that you can create so many at relatively no cost?

Sewing Camp - Project Three of Four

Day three of the sewing camp at the Fairfield Woods Branch Library was the most intense. The teens learned about patterns the day before and had actually cut out their fabric for pajama bottom shorts. There was so much to accomplish and they did it all so well.  

2015-06-03 16.34.40.jpg

Pajama shorts look pretty easy, but believe it or not, the biggest obstacle is knowing which piece is the front and which is the back.  Sounds so basic and simple, but from a quick glance it is hard to tell the difference. Upon careful comparison you can see that the back piece is slightly wider to allow for our derrieres. Then there is the issue of knowing what is the right side and the wrong side.  With many fabric choices this is not an issue, but our fabric was a soft cotton in a solid light blue that the right and wrong side could only be perceived when examined very closely. To combat both of these issues and because the pieces were cut the day before, I labeled them before the next class with four strips of blue painters tape: front left, front right, back left, and back right.  The side that had the tape on it was the right side. This made the whole process so much easier and did not cause any confusion when putting them together. 

The teens concentrated hard on the challenge of keeping all those seams straight and within the seam allowance, to insure a proper fit and to make sure those elastic casings were not too narrow. These teens were awesome and were so industrious all day long. They were practicing to be so precise in everything that they did, including clipping those curves and pressing everything. 

Amazingly, no one complained that we did not finish them that day as planned. We gave them the option to come in an half hour early and to our surprise, some were so eager that they were there almost an hour before.  What desire and motivation!  

Congratulations on a job well done. I am so incredibly proud of them. They worked hard and succeeded. 

Sewing Camp - Project Two of Four

Once you learn the basics of using a sewing machine, it is merely a matter of practice and learning new techniques, which is quite vast, but you can accomplish much with just the basics. However, the world of garment and other textile construction is quite complex. 

The sewing camp teens at the Fairfield Woods Branch Library progressed very quickly with respect to the types of fabric with which they sewed.  Their first project involved plaids. For an experienced seamstress, she would never have considered plaids for a long time since they can be quit difficult to line up when cutting. To save the teens that anguish, we did the cutting for them. The flannel was so beautiful on both sides so we did not concern them with the right and wrong sides.  We did the cutting and put the two pieces together in their kits so there would not be any chance of the plaids not being lined up. 

Cuddle/Minky Fabric generously donated to the Fairfield Woods Branch Library 

Cuddle/Minky Fabric generously donated to the Fairfield Woods Branch Library 

The second project was a plump round pillow made of cuddle material, also known as minky (minkee). This cuddle material was so soft and lush that it won their hearts with being their favorite project, but it was a challenge because it has a very deep nap.

Once again, the library was blessed to have had this lovely fabric donated and there was no issue of cutting as the pieces were generous wide one yard cuts. The fabric choices were in lively modern colors of lime green and bright pink, with trendy designs of chevron, damask, stripes, paisleys, and dots. Just the cutest fabrics you could imagine.

To overcome the obstacle of a difficult fabric and to allow the maximum amount of sewing time for the teens, we opted for cutting and pinning the two circles together.  This guaranteed that the fabric naps were going in the correct direction. It worked perfectly.  Now the teens could concentrate on sewing a circle.

The pattern instructions were courtesy of Shannon Fabrics in CA. While the teens used this predominately, I did deviate when it came to cutting the fabric circles.  

I made a thick cardboard circle template with a pin, marker and a ribbon.

I cut the ribbon the length of the radius of the finished circle's diameter which included the seam allowance.

I stuck the pin into the ribbon and the center of the cardboard and attached the ribbon to the marker with blue painter's tape, then drew a perfect circle on the cardboard. 

The template allowed me to use a rotary cutter and cut several pieces of fabric at one time, a true time saver when having to cut 28 large circles.

Here is the link to create your own pillow. Please share your pillow pictures with us.