
Most of us entertain during the holidays and serving food is always on the entertaining list. It does not matter if the food is to be served is cold or hot, it is always a challenge to keep it the correct temperature. Make this serving tray to help control the temperature of the food. The key to the tray is the "Aluminor", which is a thermal insulating barrier. It will keep hot things hot and cold things cold. This reversible serving tray is to not for lifting and serving, but for sitting and maintaining the food’s temperature within the upright sides. It is also just beautiful by itself as a decorating piece as seen in this picture.

Hope you enjoy using this double-sided serving tray all year round - New Year's, Birthdays, Thanksgiving, Super Bowl - any entertaining occasion. It is even perfect for just for decoration as in the picture above. You can embroider on one or both sides for a particular season or even embroider your family’s monogram. You can leave one side blank so that it can be used in the summer for entertaining as well as during all those winter festive occasions. The possibilities are endless. Make yours to fit a specific space just like I did.
Thank you to Fairfield World for providing the Aluminor for this project.


5 Yards 3/8” cording for piping or prepared piping
Coordinating Good Quality Polyester Thread
SUPPLIES
Sewing machine and related supplies
Piping foot (optional or use a zipper foot)
Zipper foot
Small sharp sewing machine needle (I used 75/11)
Rotary cutter, ruler, and self-healing mat, are preferred, but not necessary
Wonder Clips
FOR MACHINE EMBROIDERY:
Embroidery Machine
Sharp 75/11 embroidery needle
Embroidery design of choice (the center design is “The Harvest” by Sonia Showalter http://www.soniashowalterdesigns.com/for-the-harvest/the-harvest/) with built-in fonts
Floriani Embroidery Threads
Prewound bobbin in white
Floriani Medium Cutaway Stabilizer
“Snap Hoop Monst
er” by Designs in Machine Embroidery (Magnetic Hoop)
Snips by Famore Cutlery
STEP 1
NOTES:
1. This project uses 1/4” seam allowances, except where noted.
2. Finger press the seams open. Do not use an iron.
3. Do not bend, fold, or crease any of the materials as a permanent mark will remain.
4. Spot clean only.
5. A “Snap Hoop Monster” is strongly recommended for machine embroidering on Aluminor as the back of Aluminor does not stick effectively onto tacky stabilizer.
6. The edges of this tray were cut at a 60 degree angle so that the sides stood up slightly; however, a 90 degree angle would make the sides stand up completely and a 45 degree angle would leave the sides laying flat.
7. When sewing Aluminor for such a large project, roll it up as you go along so it does crease or get in your way.
PREPARATION:
Please read the instructions below before beginning. Gather the materials and supplies.
For instructions on how to make piping with Oly-Fun™ Metallic Gold and cording, please visit my blog post at http://www.the-embroiderist.com/blog/2017/11/20/oly-fun-metallic.
STEP 2
Cut the fabric as follows -
From the Silver Aluminor:
1 piece measuring 48” by 14.5”
2 pieces measuring 52” by 3.5”
2 pieces measuring 20.5” by 3.5”
From the Gold Aluminor:
1 piece measuring 48” by 14.5”
2 pieces measuring 52” by 3.5”
2 pieces measuring 20.5” by 3.5”
Trim the ends of the four the 3.5” strips to a 60 degree angle as follows:
On each end measure 2” from the end and mark.
Draw a diagonal line from top corner of the strip to the bottom corner where you just drew the line.

Cut along this diagonal line.
Do this for all the corners making sure that the longest point is the top of each strip. It will look like a trapezoid.

STEP 3
MACHINE EMBROIDERY: Download the machine embroidery design and load it into the embroidery machine.
STEP 4
Open the magnetic hoop and place the cutaway stabilizer on the bottom. Place large piece of the silver Aluminor right side up into the hoop and center it – verifying the correct orientation of the design.

STEP 5
Machine embroider the design.
STEP 6
Take the Aluminor out of the hoop. Trim the threads and stabilizer to about ¼” from the design.

STEP 7
Follow step 4 again, if more than one hooping is desired (my design was 3 hoopings).

STEP 8
CONSTRUCTION:
Sew the four gold Aluminor strips together to form a continuous loop.

Begin sewing at the widest part and sew down to the shortest part. STOP sewing a stitch away from ¼” mark from the edge.

The two short ends and the two long ends will meet at a 60 degree angle with the largest part at the top and the shortest at the bottom. It should form a rectangle with the two shorter sides on each end and the longer strips on the opposite sides.

STEP 9
Sew the four silver Aluminor strips in the same manner as the gold ones in step 8.
STEP 10
Clip the silver Aluminor loop to the large piece of Aluminor.
STEP 11
Sew the loop to the large piece of the Aluminor, pivoting at the corners and being careful not to bend the material.
STEP 12
Finger press the seams towards the large piece of Aluminor.
STEP 13
Follow steps 10-12 for the gold Aluminor.
STEP 14
ADDING BINDING:
Using a piping foot with the needle adjusted accordingly, sew the piping to the edge of the gold Aluminor with right sides together and using a ½” seam allowance.

Clip the corners just before pivoting to make the turn easier.

You may need to use a stiletto to push the binding back under the foot and into the groove.

Splice the ends together to form a seamless edge.
Stop stitching 2" from the matching point and trim the excess binding to about 2" longer than the other side.

Open the free end.

Trim about 1" of the cording.

Slip the two pieces together to form one piece of binding.

Continue sewing to complete the loop.

Trim corners.

Remove the piping foot.
STEP 15
Finger press the piping towards the top of the strips.
STEP 16
Set the sewing machine length to a basting stitch. Baste the top edge of the silver Aluminor ½” all the way around, pivoting at the corners. This will be used as a guide to turn it down. Trim corners.
STEP 17
Fold the silver Aluminor down along the ½” basting stitch and finger press in place.
STEP 18
Turn the gold Aluminor piece inside out, with the right side facing down.
STEP 19
Place the silver Aluminor piece inside the gold piece, matching the silver edge that has been folded down snuggly against the gold piping.

Clip in place.

STEP 20
Check to make sure that they both fit snuggly one inside of the other. Adjust if necessary.
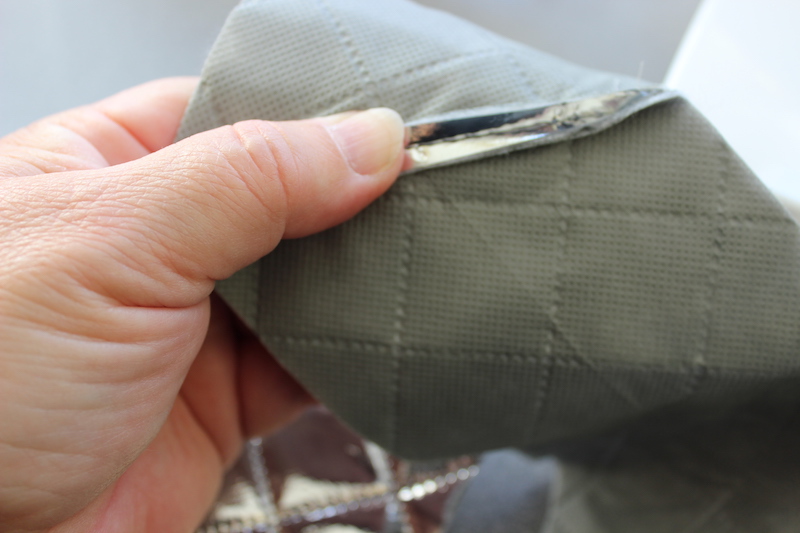
STEP 21
Using a zipper foot with the needle adjusted accordingly, stitch as close as possible to the edge of the silver edge that was folded down without going over the edge.

22
Check to make sure that both pieces are sewn together well.

Remember it is reversible so you can use either side depending upon your décor or occasion.

Enjoy!